Sunday, January 29, 2006

Hanging Stoves!


DSCN0237
Originally uploaded by maxots.
Coun't yourself lucky if you can find one of these rare hanging stove setups. You can modify it to take a canister stove or an msr type stove. I'm currently trying to convert this one into a modular setup so i can bolt in either my pocket-rocket or a liquid fuel MSR, depending on the conditions.

Thursday, January 26, 2006

Some training ideas specific for alpine climbing

Mt cook area
The mighty Southern Alps, New Zealand.

Prominent are (from left to right): Mt Sefton, The Footstool, Mt La Perouse, Aoraki - Mt Cook and Mt Tasman


Many people looking at getting into Alpine don�t quite know what to expect. This is especially true in Australia when our grandest peak has a 4 wheel drive track to the top. However there are �alpine� challenges in Australia and there are ways to prepare yourself for bigger trips. Most Australians will first go to New Zealand, usually in the summer season. The preceding winter offers many opportunities to develop skills whilst still in Australia that will give you a head start once you get to New Zealand.

Firstly what is involved in climbing a New Zealand? Well firstly there is usually a horrific walk over horrible moraine; followed by weaving your way through crevasses on a glacier. As the approaches are so long, usually a bivouac or a stay in a hut will follow. After that you can generally expect more glacier travel followed by either rock, ice snow or mixed climbing. Each of these media presents different challenges and, to a degree, you can train your skills on all of them right here in Australia.

Nz

Approaches:
I wont tell you how to train, but I would advise doing some. In Australia we just don�t have the same height gains as in New Zealand. Emphasise hiking up hills, sometimes with a pack: hiking uphill is 90% of mountaineering. Most mountaineering texts say that 300m uphill an hour is a good pace. Try to aim for 500m and hour comfortably. Days gaining anything up to 2000m of altitude are not uncommon in New Zealand.

Crevasses;
You can learn crevasse rescue at any climbing wall or cliff. Self rescue skills from crag climbing will help here. Find a text, or if your unsure an instructor and learn how to haul. Learn how to prussic, with one cord only, with a variety of set-ups, and with a minimum of gear. You can even practise using snow stakes in the ground (good earth is as solid as any snow) but do it all with a bomber backup anchor. If your taking a course in New Zealand, it makes sense to learn crevasse rescue before you arrive, otherwise you�re wasting your $400 dollars a day sitting in crevasses when you could be climbing peaks. Obviously we don�t have Crevasses in Australia, but large snow banks and cornices can be found to practice at. (oh and don�t throw your buddy off, practice rescuing a weighted pack if your just learning this stuff) The Kosiouszko cornice can be good for this.

Bivouacing:
You can learn all the aspects of living in the cold in Australia. You really don't need much if you're sleeping in huts (the huts in NZ are much cosier than those in Oz) It is also worth learning how to bivouac. I don't like tenting as tent are heavy and they blow away in high winds. Always aim to minimize how much stuff you have to carry: if you sleep in all your clothes you can use a lighter sleeping bag. Down sleeping bags are lighter but it is false economy if it gets wet. Eating utensils can be light; learn to manage with one pot and a spoon each. Make up recipes which only require boiling water. Test out your clothing systems, and especially find a glove system that works. Two Items of clothing will greatly increase your comfort: a windshirt and a belay jacket. the windshirt (eg marmot driclime) can be worn in a huge range of conditions, minimising stop-start layering and a synthetic belay jacket can be thrown over whatever else your wearing once you stop, down will get wet if you try this with it. Get comfortable in the winter environment, NZ is a lot more hostile than Oz!

Alpine Rock:
Most people getting into mountaineering come from either a rock climbing or a hiking background. Those with skills gained crag climbing will find them useful in mountaineering. Those without such skills must learn them. Alpine is like the difference between sport and trad all over again. Be prepared to adjust a little once in New Zealand. The first thing you will realise is that NZ rock (with a few wonderful exceptions) is pretty bad. Learning how to climb loose rock safely can be done on �crap� climbs at home. Try to find long scrambles where you can practice moving confidently unroped on easy terrain. Go adventure climbing at places like the Warrumbungles, Mt Buffalo and Bungonia. Practising climbing in bad weather and at night are also incredibly valuable as you won't get so scared when confronted with these situations in the mountains.

Rock Scrambling
Alpine Rock Traverse in the Remarkables, New Zealand. Most of this was unroped scrambling at around Oz grade 6 - 12

Alpine Ice:
There are a few destinations in Australia where you can hone your ice climbing skills. I am planning on posting a guide to winter climbing in Australia in the near future. Online Guides to Mt Bogong and Mt Buller can be found at www.chockstone.org; Blue lake also has some Ice climbing possibilities.
Finding long slopes of easy ice where you can practice front pointing and leading will have more benifits for beginners than top roping 5m high bits of water ice. (although they are much more fun) Don�t expect to find too many good screw placements in Australia. Carry snow-stakes or (heaven forbid) sawn off snow-stakes!

Infinite possibilites
Blue Lake in Winter: The Ice conditions in this photo are a tad thin, unfortunately!

Alpine Snow:
Practicing cramponing (French technique) and self arrest in Australia makes obvious sense. Find a relatively steep slope, get some speed and learn to self arrest in every orientation (front/back, headfirst/feet-first) Practice without your crampons on. Several people have broken their legs after snagging crampon points while practicing. Learn how to hold your axe when walking and how to self belay with it. Learn American technique too, and all the other variations with their funny French names!
You can build snow anchors in Oz too! Learn how hard snow has to be to take a stake and when you need a dead-man instead. Build them, then test them, and try to pull them out; learn how much force they take, you don�t want to learn these things half way up a route in New Zealand.
Learning to ski can help speed up approaches in winter. In fact XC skiing in australia is probably the best way to get fit while also collecting experience spending time in the cold.
Sleepy guy
Here is a picture of one training trip XC skiing in the dark; we left canberra at 11pm (after a freinds going away party) got to the snow at 2am, skiied until about 5:30am, then tested out new bivy sacks till dawn, then skiied for another 5 hours or so. We left for home at midday and I got back for work that afternoon at 3:30pm!


Mixed Climbing:
Learning to confidently climb rock in crampons is a valuable skill. However: do not bring your axes/poons to the local crag or climbing wall. Do not damage the rock. You probably won�t be allowed in your climbing gym (ever again) if you try this.
Try to visit Buller or Bogong. Maybe you can find a brick wall to practise traversing on. If you visit the snow in the winter many of the chalets offer excellent technical dry-tooling possibilities on those lovely stone walls around the edge. Try not to get caught, and if you do, I didn�t endorse doing this!

mixed
Climbing rock in Crampons, New Zealand

THIS ARTICLE IS NOT FINISHED: I HAVE LOTS MORE INFO TO GO IN HERE! SOON!

Australian Winter Climbing

STILL A DRAFT! SORRY CHECK BACK SOON FOR FULL ARTICLE!

Wednesday, January 25, 2006

Rime on Mt Earnslaw, NZ

Frosty Gully


Mixedclimbearnslaweast
Originally uploaded by maxots.
Climbing the east pk of Mount Earnslaw, near Glenorchy, New Zealand. We had just pitched a couple of ropelengths below this, then I traversed in from the right of this photo. It wasn't hard but that drop to the left was awesome. You can see the Olivine Ice Plateau in the background (I think)

More New Zealand photos coming soon, for now they are already at the flickr site, see the link on the right sidebar.

I'm going to do a trip report on this NZ visit, but it all takes a lot of time, and the photos are the best bit anyway.


Dodgy Rap anchors!

Tuesday, January 24, 2006

Ozymandias > Cheats Beta


ozy!!! 011
Originally uploaded by maxots.


I met a traveler from an antique land
Who said: Two vast and trunkless legs of stone
Stand in the desert. Near them, on the sand,
Half sunk, a shattered visage lies, whose frown,
And wrinkled lip, and sneer of cold command,
Tell that its sculptor well those passions read,
Which yet survive, stamped on these lifeless things,
The hand that mocked them, and the heart that fed,
And on the pedestal these words appear:
"My name is Ozymandias, King of Kings:
Look upon my works, ye Mighty, and despair!"
Nothing beside remains. Round the decay
Of that colossal wreck, boundless and bare
The lone and level sands stretch far away.
-Percy Bysshe Shelley
1792-1822


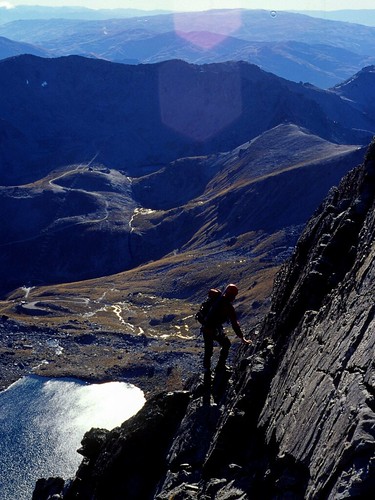
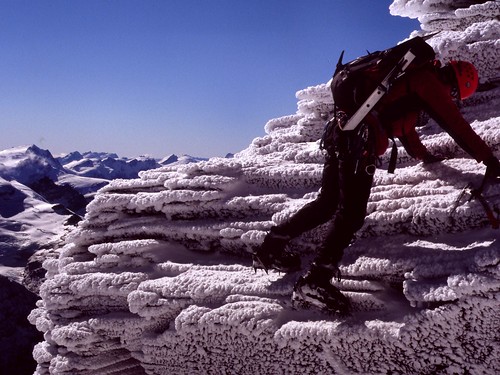
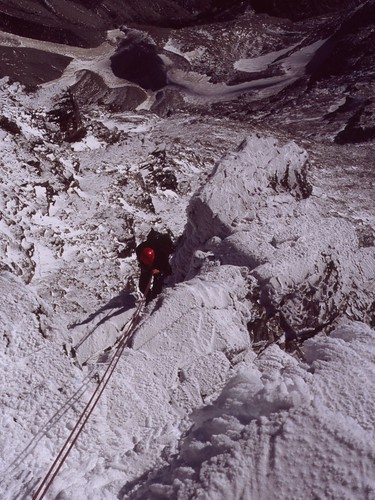
Ozymandias; what can I say. It is The big Aid climb to do in Australia. We don't have anything really big, but if you want to learn in preparation for Yosemite, or if you just want the Australian Aid experience > then you had better get on Ozy!!!

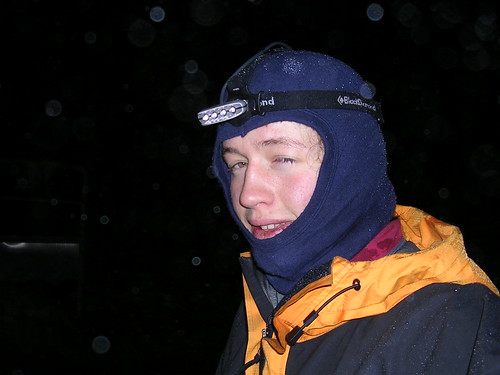
Finding beta on Ozy isn't too hard, but I haven't seen a good online article, so I thought I would put up some info based on my own experiences. I climbed Ozymandias in between 7-9th of May, 2005. I was 17 and it was my first "bigwall", also my first time up the north wall at Mt Buffalo. This isn't inteded to explain the technicalities of leading/hauling and other big wall shenanigans, only to give some ozy specific beta.

Preparation:
Ozymandias gets a grade of M4 which is about A2/A2+. If you are stronger than me you could climb some of it free, and this woud speed you up a bit. Don't let the high free grade fool you though; you can aid all but the first pitch, which is maybe grade 16/17 at the most. This climb is not out of reach for a strong trad/adventure climber who is willing to put the time in to learn how to aid climb. In terms of aid practice, we did a few laps on a local aid climb in Canberra "Vertigo" It is about 30m of M4. I would also advise practising aiding up steep hand crack and such, as some of the pitches are easier "cam jugging" and being practised at this could really speed you up.
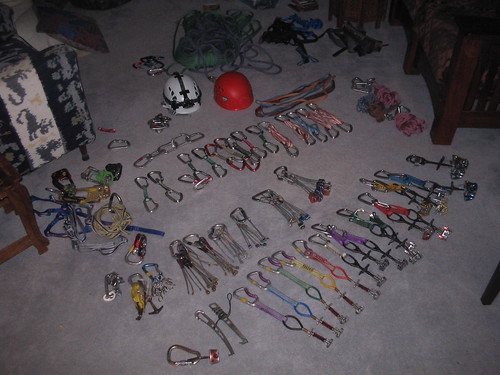

Big wall Rack


Equipment:
We took a fairly large rack for Ozy, I guess it depends how much backcleaning you want to do. One thing: Ozy goes clean!
Do not take a hammer on this climb, it is now one of the best free routes in the country, as well as being a killer aid route; DO NOT ruin it for others by taking pins and damaging the rock; if you want to nail, there are some harder routes at Buffalo where this is accepted. Ozy is a clean aid climb!


Personal Gear:
Harness, helmet, headtorch, shoes. etc
one set aiders each (or one set for the leader + a set of sling steps for the second to jug with)
2 x daisy chains (we took 3 and swapped around, but you may as well have 2 each)
one set of ascenders each (maybe you could take one set between you if your doing it in a day and swinging leads)

Rack:
One 'burly' 60m lead line
One 60m haul/tag line

Aliens 1 - 5
Single Camalot # .4
Double Set camalots 0.5 - 3 (or equivilant freinds)
Camalot 4 + 5
3 sets small wires (we took 2 xsets RP's, one set small BD nuts > lots of people recommend DMM peenuts for the pinscars)
double set normal wires (we took 2x 4-13 BD stoppers)
couple of skyhooks (we had one BD talon + one BD cliffhanger)
10 bolt plates
cinch hangers (for the dodgier carrots > if you can find them)
a bunch of hero loops (short loops of tape for tying off fixed gear)

5 "trad" (extendable) quickdraws + a bunch of shoulder slings
10 normal draws
about 15? spare biners

2 x Anchor kits > we built separate power points for fixed line, and haul line. this means two cordelettes per anchor plus associated biners and lockers. Oh and if you can get one, take a wall hauler (eg petzl mini traxion)


Overnight Gear: (each)
Sleeping bag (synthetic) + bivy bag + plus sleeping mat (NOT thermarest > they pop)
Rain gear/warm clothes
At least 3 litres of water per person per day!
Food for however long you're up there, suggestions:
brekkie: instant oats/protein bars/muesli bars etc
lunch:take things you can eat out of your pockets eg, muesli bars/energy gels?/nuts/dried fruit/mini cheeses/ salami
dinner: instant meals (if you take a stove)/tiined chili beans + tortillas/tinned fish/biscuits+cheese/couscous+tofu
Remember tinned foods are great wall food as you need the water anyway!
Poop Tube: all the above comes out the other end. DO NOT SHIT ON BIG GRASSY : PACK IT OUT! we took plastic bags and them put them in screw top tubs (1 litre capacity each sufficed for 2 days) take a pee bottle too: pack it out!
Haul bag to take all this crap in!

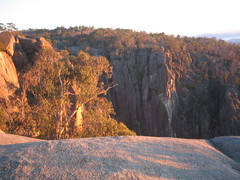
Access & Retreat (courtesy of Anthony Morgan)
• Park at the Oval Picnic Area. Walk across the oval to join the Gorge Heritage Trail and follow to the left
• Follow the trail across the bridge and along the top of the North Wall. Take note of the loop trail going off to the left just before the bridge. Don’t mistakenly take this on the way out in your big wall drowsiness or after dark
• At the second Heritage Sign, which displays an old photograph of a vintage car and lady passenger, turn right and follow faint track to the cliff edge. Turn left along the cliff edge to a large boulder perched on a sloping ramp. Abseil anchors can be found on the outside of the boulder
• 60 metre ropes are required for the abseils (53m longest rap)
• First abseil - chains were extended with a sling to ensure ropes didn’t get stuck
• Second abseil pitch is long and requires a small swing to the left (FO) to the next anchor bolts. Be wary of the flake above left when pulling down the ropes
• Third abseil pitch to Comet Ramp. Scramble up small rise and then two scrambling abseils to the base of the climb. From here it is about a 10-minute walk to fill water bottles


If you are in the unfortunate position of having to retreat back to the base of the climb, the following is the way to walk out. Go down to the creek from where you fetched the water. Look carefully for a rock cairn when crossing the creek, and then continue to follow these cairns. They are not always frequent or obvious to see, a fair amount of crushed vegetation is encountered though. Continue to follow the cairns across another creek then up steeply for some way. Not too far from the base of Where Angels Fear to Tread you will come to the base of a small wall which angles upwards to the right. Do not trend right up this large ramp, but go a short distance to the left where you should find a knotted length of rope to go up (awkward). Don’t be tempted to turn right near this rope. You are heading for the base of ‘Where Angels Tear to tread’. Once at the base of this climb the track becomes more distinct, this will take you to the hang glider ramp. 3 hours.


Ozy topo rough


Tactics:
Most people doing Ozy for their first time do it in 2-3 days. Strong parties could do it in a day. I have not yet done it in a day so I will not offer advice on that, and anyway if you're planning it in a day, you must already know more than me.

3 days: you must be confident climbing/cleaning/hauling 3-4 aid pitches a day!
Day 1: You need to get to big grassy : sleep on big grassy

day 2: you need to fix your lead and haul line to the gledhill bivi, then rap down and sleep on big grassy

day 3: jug back up and push through to the top > well done!

2 days: you need to be confident climbing about 5 pitches a day of aid.
day 1: preferably you want to fix from big grassy to the belay below the roof pitch: sleep on big grassy

day 2: jug the fixed lines then finish the climb.

Pitch by Pitch descriptions courtesy of Anthony Morgan

Pitch 1 to 5

Pitch 1: A1 Corner, 24m
• Start at two aid bolts on the blank wall. Free over into the Ramp and steepening Corner with its perfect A1 crack. Up to belay on a large flake ledge with 3 bolts
• Nuts, aliens and cams to #3

Pitch 2: A2+ Corner, 34m
• Technical aiding up the thin corner using the blown out pin scars to a hanging belay
• Small nuts are excellent in the pin scars, as are aliens and cam hooks. Nuts and cams to #2

Pitch 3: A2+ Corner & sloping bulges, 46m (to #3, hooks)
• Technical aiding up the thin corner through 2 sloping bulges on more blown out pin scars. Hook or traverse left onto a ledge, then leapfrog large cams up to Big Grassy
• Small nuts are excellent in the pin scars, as are aliens and cam hooks. Nuts and cams to #3. One section, 2/3rds up the corner is very thin requiring either a leeper logan hook or carefully placed #2 BD offset nut

Big Grassy Bivy:
• BG has bolt anchors and a good crack in the corner
• Two sleep comfortably

Pitch 4: A2 Corner, 20m
• Technical aiding, up the corner above BG to the yellow roof. Extra gear can be placed in the crack to back-up the belay
• Nuts, aliens and cams to #1

Pitch 5: A1 Superb Corner, 35m
• Move up and right into the Superb Corner. Once below the roof, either go left on an obvious tiptoe ledge to belay at the arete, or right on a bolt ladder to a HBB under the roof pitch of Ozy direct
• The corner takes mainly large wires and aliens, with the occassional cam (to #3 for Ozy original)


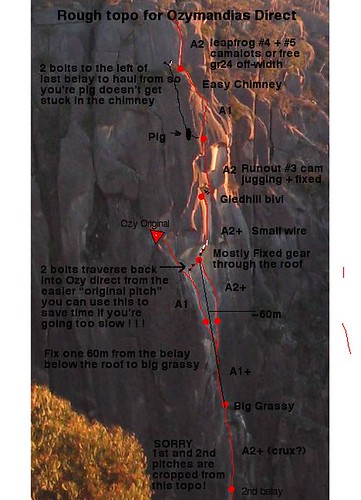
Ozy Original Pitch 6 to 9

Pitch 6: A1 Awkward Corner, 45m (to #3.5)
• Good placements but awkward aiding. Up the ramp, into the hanging corner, over the bulge to belay at two bolts and the diagonal crack
• Nuts, aliens, cams to #3.5 and lots of slings. Hooks can be useful for quick placements

Pitch 7: A1 The Traverse, 15m (to #3.5)
• Aid under the tree, then shuffle cam’s (Sizes 2,3,3.5) along the large uniform crack to the chimney

Pitch 8: A1 The Chimney, 29m (Aliens, #1 to #4.5)
• Use two Aliens in pin-holes to get up to the tree. Climb up the tree and into the chimney. Place the #4.5 on your left then chimney up to belay on a ledge

Pitch 9: Scramble, 23m.
• Coil all the ropes, duck under the blocks into the back of the chimney. Ferry gear to the left, scramble up right and then haul straight up the hole. Repeat. Finally crawl through the body squeeze at the back of the chimney and again haul straight up through the bigger gap. Ferry to the lookout

Ozy Direct Pitch 6 to 9

Pitch 6: A2+ The Roof, 30m
• Bolts to the roof, then aid through roof and follow the thin crack to the Gledhill bivvy
• Nuts, aliens, cams to #0.5 and lots of slings

Pitch 7: A1 The Fang, 30m
• Follow bolt ladder to the right. Up ramp to beneath the fang, before moving left into a large, gnarly crack. Shuffle cam’s up crack and over bulge to HBB
• Nuts, aliens, slings and cams to #4.5

Pitch 8: A1 The Chimney, 30m (Aliens, #1 to #4.5)
• Continue shuffling large cams to a bolt. Mantle on to ledge, then scramble up chimney to belay at top
• Large cams. Nuts and a few cams for the belay (#1 to #3)

Pitch 9: A2 or 22 Chimney/offwidth, 28m.
• Up the crack / corner to the tourists at the lookout
• Nuts and large cams to #4.5 (protect the first half with nuts in the crack to the left)


DISCLAIMER: I AM NOT RESPONSIBLE FOR ANYONE WHO TRYS TO CLIMB THIS ROUTE AND HAS AN EPIC. CLIMBING IS ABOUT TAKING RESPONSIBILITY FOR YOUR OWN ACTIONS: THIS IS A SERIOUS ROUTE FOR EXPERIENCED CLIMBERS, YOU MUST BE ABLE TO ASSESS YOUR OWN ABILITY IN RELATION TO THIS CLIMB, THIS ARTICLE ONLY OFFERS TIPS TO THOSE WILLING TO ACCEPT THE POSSIBLE CONSEQUENSES OF FUCKING UP ON THIS CLIMB; CLIMBING CAN KILL YOU: TAKE CARE!

If you need any more information please email me max.fourman@netspeed.com.au

Sunday, January 22, 2006

Links to any Posts of Interest

Training Stuff This is all linked within itself so from here you should be able to find all other related stuff...

Trip ReportsThis page has a timeline of climbs or trips that have been important to me, It is ordered chronilogically and as time goes on I hope to link trip reports from this page

Articles:

Ozymandias: Exensive Beta; access, topo, gear list, pitch descriptions


Some training Ideas for Alpine Climbing

Australian Winter Climbing

A look at Hanging Stove setups

Blue Lake Ice 13-14 Aug '05

The first trip report for the site...

Well after spending the best part of the winter searching for new experiences around parliament house canberra (inside joke) and finding that source of fun drying up, It was thought to be about time to go Ice Climbing.

Now Australia isn't exactly known for it's winter climbing possibilities, but sure enough, along with the kangaroos we do have the odd bit of Ice. Scattered around the Australian Alps are various places where one can go play in winter, but we we're headed to Blue Lake. Having rock climbed on the wonderful granite in summer I was hoping to climb some of the easier summer rock climbs in winter.

I set out around 7pm on Friday Night, with the irrepresible Marcus Morley at the helm. unfortunately the drive got longer and longer as we first had to stop to get snow chains, then hire snow shoes, then we got a speeding ticket.... Anyway we got to the Guthega car park at around midnight, and decided we couldn't be bothered getting our sleeping bags out of the bottom of our (already packed) packs. Ever resourseful we managed to sleep by taking the cover of the car seats and wearing them like furry sheepskin jackets. Lovely!

An Early start


Blue lake 13-140805 004
Originally uploaded by maxots.
Photo of me!


The Blue Lake cirque

Climbing Timeline

Hopefully this can eventually include linked trip reports for various trips where I had a camera with me...

August '04 - Solo XC Ski Attempt at Kiandra to Kosioszko
I bailed after my stove broke and I had had multiple epics crossing swollen rivers. This trip was maybe not the most intelligent thing I've ever done, but it was one of the most fun!

September '04 - First winter Climbing

Dec ’04 - One Month spent Mountaineering in New Zealand
Attempts on The Nuns Veil and Mt Aspiring

April ’05 - One week spent at Mt Arapiles, Victoria

April ’05 - Two Weeks Spent mountaineering in New Zealand
Ascent of Mt Earnslaw (East Pk) via a variant on the east face route

May ’05 - Ascent of “Ozymandias”
At Mt Buffalo, Victoria. One bivouac on the wall.

Ozy Beta: an article providing essential beta for those wanting to try Ozymandias

Aug '05 Ice Climbing at Blue Lake, Mt Kosiouszko Area.

Oct ’05 Climbing in Europe – climbed many classic Gritstone climbs in England. Also bouldering at Fountainbleu, France

Nov - Dec ’05 6 weeks living at Mt Arapiles, Victoria.

Jan ’06 - 2 Weeks Sport climbing in the Grampians, Victoria

Jan ’06 - Climbing at Mt Buffalo, finally got on “Where Angels Fear to Tread” it rocks!

Apr '06 - Ascent of Holden Caulfield over 2 days with a wet portaledge bivy, then snow for the crux pitch

June '06 - A month of winter mountaineering in New Zealand with long time friend Marcus Morley

First Post

I have set up this blog so freinds can see various climbing related info...

Lets see how it goes

M